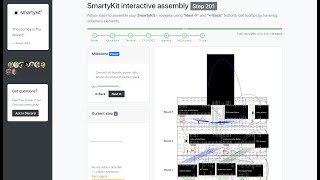
Media Summary: Demo of our Interactive step-by-step instruction – You could use slider to move to every ... At first you need to connect your 5 breadboards, insert SmartyKit 1: Starting Display (Getting to the first milestone of Apple-1)

Smartykit 1 Power On - Detailed Analysis & Overview

Demo of our Interactive step-by-step instruction – You could use slider to move to every ... At first you need to connect your 5 breadboards, insert SmartyKit 1: Starting Display (Getting to the first milestone of Apple-1) SmartyKit 1: simplest scheme to test 6502 CPU with NOP instruction SmartyKit 1: Starting Terminal (Keyboard&Video controllers) How to assemble 2.8” TFT display module - you need a display, blackboard module, 8 bolts and 4 holders.

Recording of Zoom webinar on how computers work with explanations based on Apple- It runs with auto command run Keyboard driver option so it could operate without PS/2 keyboard connected. The program is ...

Photo Gallery

SmartyKit 1 Power On
SmartyKit – How it works? Inside Apple-1 on breadboards
SmartyKit 1: running eight Power-on self-tests (POST)
SmartyKit interactive step-by-step instruction demo – starting Display module
SmartyKit 1 - testing power lines
Running SmartyKit 1 on Emulator step-by-step
SmartyKit 1: Starting Display (Getting to the first milestone of Apple-1)
SmartyKit 1: simplest scheme to test 6502 CPU with NOP instruction
SmartyKit Apple-1 – how to build computer on breadboards step-by-step
SmartyKit 1: Starting Terminal (Keyboard&Video controllers)
SmartyKit 1 - How to assemble TFT Display module
#13 Smartykit Computer unboxing
View Detailed Profile
SmartyKit 1 Power On

SmartyKit 1 Power On

SmartyKit 1

SmartyKit – How it works? Inside Apple-1 on breadboards

SmartyKit – How it works? Inside Apple-1 on breadboards

In this video we explain how

SmartyKit 1: running eight Power-on self-tests (POST)

SmartyKit 1: running eight Power-on self-tests (POST)

CPU of

SmartyKit interactive step-by-step instruction demo – starting Display module

SmartyKit interactive step-by-step instruction demo – starting Display module

Demo of our Interactive step-by-step instruction – https://explnr.co/interactive-scheme-demo/ You could use slider to move to every ...

SmartyKit 1 - testing power lines

SmartyKit 1 - testing power lines

At first you need to connect your 5 breadboards, insert

Running SmartyKit 1 on Emulator step-by-step

Running SmartyKit 1 on Emulator step-by-step

How to get emulator,

SmartyKit 1: Starting Display (Getting to the first milestone of Apple-1)

SmartyKit 1: Starting Display (Getting to the first milestone of Apple-1)

SmartyKit 1: Starting Display (Getting to the first milestone of Apple-1)

SmartyKit 1: simplest scheme to test 6502 CPU with NOP instruction

SmartyKit 1: simplest scheme to test 6502 CPU with NOP instruction

SmartyKit 1: simplest scheme to test 6502 CPU with NOP instruction

SmartyKit Apple-1 – how to build computer on breadboards step-by-step

SmartyKit Apple-1 – how to build computer on breadboards step-by-step

Here is a demo of

SmartyKit 1: Starting Terminal (Keyboard&Video controllers)

SmartyKit 1: Starting Terminal (Keyboard&Video controllers)

SmartyKit 1: Starting Terminal (Keyboard&Video controllers)

SmartyKit 1 - How to assemble TFT Display module

SmartyKit 1 - How to assemble TFT Display module

How to assemble 2.8” TFT display module - you need a display, blackboard module, 8 bolts and 4 holders.

#13 Smartykit Computer unboxing

#13 Smartykit Computer unboxing

I bought a

SmartyKit PixelArt Demo on Workshop Apple-1 board

SmartyKit PixelArt Demo on Workshop Apple-1 board

Here we restart

How computers work? SmartyKit webinar for geeks on Apple-1's birthday with Steve Wozniak

How computers work? SmartyKit webinar for geeks on Apple-1's birthday with Steve Wozniak

Recording of Zoom webinar on how computers work with explanations based on Apple-

Starting SmartyKit Test Board to run Steve Wozniak's face program

Starting SmartyKit Test Board to run Steve Wozniak's face program

It runs with auto command run Keyboard driver option so it could operate without PS/2 keyboard connected. The program is ...